
How to Build a Power App and Power Automate Cost Approval Flow in 15 Minutes with MCP and AI Agents
Forget endless drag-and-drop. Low-code is entering the era of agentic development.
Building cost approval systems on Microsoft Power Platform still takes real time: assembling UI components by hand, wiring up SharePoint or Dataverse schemas, writing Power Fx formulas, and debugging the Power Automate integration.
With MCP (Model Context Protocol) and dedicated Power Platform MCP servers, the approach changes. An AI coding agent, for example Claude Code, connects directly to your co-authoring session and generates finished screens, business logic, and approval cloud flows in a matter of minutes.
In this article we break down the architectural pattern and the step-by-step process of building an end-to-end cost approval app with an automated workflow. In about 15 minutes.
The solution stack
Backend: SharePoint List / Dataverse. An expense request table: Expense Title, Amount, Category, Requestor, Cost Center, Date, Status.
Frontend: Power Apps Canvas App. Adaptive UI, a registry of submitted requests, a form for new budget approval requests.
Automation: Power Automate Cloud Flow. Approval process, conditional logic, email notifications, status updates.
Orchestration / AI: Canvas App MCP Server and Power Automate (Flow Agent) MCP Server, driven by the AI agent.
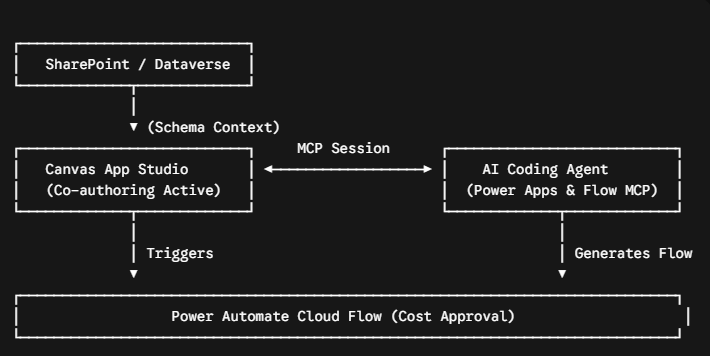
Step 1. Initialize the MCP session for Power Apps
Preparation: create an empty canvas app in Power Apps Studio, connect it to the data source, and switch on the Co-authoring toggle in the app settings.
Context handover: copy the edit-session URL and pass it to the AI agent.
Auto-connection: through the Canvas App MCP Server, the agent reads the app structure, the environment, and the schema of the connected table. Field types, amounts, cost categories, user relations.
Step 2. Generate the UI and business logic in natural language
Instead of manually placing galleries, text fields, and buttons, we state the task to the agent:
“Create an adaptive screen for mobile and desktop devices. Add a gallery of my current expense approval requests, filtered by the signed-in user and sorted by date, plus a form for submitting a new budget request.”
What the agent does under the hood. It clarifies UX preferences: element density, behavior when there are no active requests. It generates correct YAML for the UI elements and writes it straight into the active Power Apps Studio session.
The Power Fx formulas (Filter, Sort, Patch) come out delegable from the start. The approval status defaults to Pending on the Patch call.
Step 3. Generate the Cloud Flow through the Flow Agent MCP
The next task: kick off the budget approval process the moment “Submit Request” is clicked. We hand the agent a prompt:
“Create a Cloud Flow with a Power Apps trigger in the specified environment. The flow should take the request data (title, amount, Cost Center), send an approval request to the finance controller, set the status to Approved on approval or Declined on rejection, and send a final notification to the requestor.”
An architectural nuance the agent surfaced on its own. While parsing the context, the Flow Agent MCP pointed out a logical gap: the fields being passed (Title, Amount, Category) aren’t enough to update the request status in the data source, an Item ID is required.
The agent added the parameter to the trigger specification by itself. Nobody asked it to.
Step 4. Solving the 2-minute timeout problem
There’s a classic issue when integrating Power Apps and Power Automate in financial approval processes. If the trigger waits for a response through the “Respond to a PowerApp or flow” action, the wait is capped at 120 seconds.
A budget approval by a finance director or manager can take hours or days.
The architectural fix: the agent removes the Respond to Power Apps block from the Cloud Flow, turning the process asynchronous. A Refresh control is added to the Power App, and the user sees a notification: “Your approval request has been submitted, the status will update once management responds.”
Both MCP servers, Canvas App and Flow Agent, update the app code and the flow structure in sync.
Step 5. Permissions (Run-Only Users) and deploy
For correct operation in a corporate environment, we change the flow’s execution context. The Run-only users setting in Power Automate is switched to use the running user’s account.
We publish the app and share it with employees and finance controllers.
In testing, the loop works end to end: an employee submits an expense request, the finance manager receives an actionable email or Teams notification with the request details. One click on Approve or Reject, and the status in Power Apps updates on refresh.
Key takeaways for Solution Architects & Enterprise Leaders
Development velocity. An AI agent with MCP doesn’t generate code snippets for copy-pasting. It interacts directly with the Studio APIs and edits the application’s object model in real time.
Context awareness. The MCP servers feed the agent the data schemas, column types, and system relations, which eliminates errors in the generated Power Fx.
The human remains the architect. AI handles the routine work of writing YAML, laying out screens, and templating flows. Architectural control stays with the engineer: financial timeouts, approval limits, security contexts, asynchronous design.
Discussion for practitioners
Have you already automated cost approval processes with AI agents on Power Platform? What challenges do you hit when handing financial approval context and rules to AI models?
Share your experience in the comments!
Power Platform MCP server: https://github.com/MicrosoftDocs/powerapps-docs/blob/main/powerapps-docs/maker/model-driven-apps/power-apps-mcp-server.md